Staff Guide: Exam marking tool
Introduction
The Exam Marking tool in MMS is used to set up the structure of an exam and calculate students’ overall exam marks. It allows you to define sections, assign mark values to questions, apply scaling or grade boundaries, and manage how marks are recorded—either through single or double marking. This tool is especially useful when exams include multiple parts or when students are allowed to choose from a set of questions (e.g. answer 3 out of 5). It’s different from the Online Exam tool, which is used to deliver the exam itself. However, the two can work together so that markers can enter marks directly into the system while using the Exam Marking tool for calculations and reporting.
Tool access and configuration
To create an Exam tool in MMS:
- Log into MMS: https://mms.st-andrews.ac.uk/mms/user/me/Modules to access the Modules page
- Access the Module Overview by selecting the Module title on the Modules page, or by searching for the module using the Search functionality in the top right of the Modules page.
- On the Module Overview scroll down to the Tools section
- From the Additional tools panel select the tick box next to the Exam marking option
- Select the Create Tools button
- A new tool will appear in the Tools table
- (Optional) If required, rename the tool by replacing the old name in the text field in the Name column. Select the Update Tools button to save.
Once created the Exam tool can be accessed direct from the Modules page in MMS, or via the links on the Academic Activities workspace in MySaint (see Figure 1).

Figure 1: Links to Exam tool in MySaint (left) and the Modules page in MMS (right).
Accessing the configuration page
Accessing the Exam marking tool before it has been configured will automatically take you to the configuration pages. Alternatively, you can return to the configuration pages by selecting the Configuration link from the navigation panel in the left.
Creating sections and questions
In MMS, a section is a group of questions that are each worth the same number of marks. This setup is especially useful for exams where students must answer a selection of questions (e.g. 3 out of 5). If each question is worth a different number of marks, you should create a separate section for each question. The sections in MMS don’t need to match the exam paper exactly—you can rename them at any time to better reflect the structure or wording used in the paper.
To configure the tool:
- Access the Configuration page
- In the Exam Setup section, enter the number of sections in the field provided
- Select the Next button.
- Complete the table with the number of Questions, Required Answers and Marks per Question.
- Select the Finish button to save the changes.
View options and reporting
Under the main exam section and question table there are other configuration options. To complete the standard Exam configuration:
- Select the required view and reporting options from the drop down lists
- Select the Save Exam Paper Configuration button to save.
The View and reporting options are:
- Student Identification: This defines how the students will be displayed on the page:
- Show only student IDs – this option should be used for anonymous marking and will display students by their matriculation number. This is the default.
- Show student names and student ID’s – this option will display the student names and usernames in addition to the matriculation number
- Single/double marking: This defines the type of marking used in the tool. The options are:
- Marks are entered once, last mark entered is used – for single marking. Multiple users can enter marks but only the last entered mark will be used. This is the default.
- Two sets of marks; must agree with each other – for double marking. Two markers can enter marks independently and MMS will flag when marks do not agree.
- Reporting: This defines how many marks the Exam tool will pass to the Final Grade tool. The options are:
- A single grade – The exam tool will calculate a final exam grade and then pass this to the Final Grade tool. This is the default.
- Each section produces a grade, all with the same map – The exam tool will calculate the mark produced by each section separately based on the selected mark/grade map, and pass these individual marks to the Final Grade tool in addition to the final exam mark. Each section produces a grade, via own map – New options will appear on the Mark-Grade Map tab to allow a different mark/grade map to be selected for each section. The exam tool will calculate the mark produced by each section separately based on the selected mark/grade map, and pass these individual marks to the Final Grade tool in addition to the final exam mark.
- ‘If grades have not been entered for all work a student is expected to complete’: This defines how the exam tool handles the situation where not all the required questions have had marks entered. The options are:
- Treat missing grades as 0 for reporting – where marks have not been entered for a question, MMS will calculate a final exam mark assuming the student received a 0. This is the default.
- Do not report a grade to final grade tool – if not all the required questions have been answered, MMS will not pass an exam mark for that student to the Final grade tool.
This is usually the last step for most simply structured exams. The Additional configuration options section describes other optional configuration options.
In addition to the basic configuration options the Exam tool can be configured to handle more complex cases.
Scale Factors
Scale factors control how much a section influences the overall exam mark. In most cases the scale factor can be left as 1 a mark for one question normally has the same weight as a mark in another question – however scale factions can be adjusted using the field in the Scale Factor column and selecting the Save Exam Paper Configuration button at the bottom the page. This works by multiplying the number of marks the student received for a question by the scale factor.
The Relative weightings of sections chart (as indicated in Figure 2) will display the weighting of each section after scale factors have been applied.
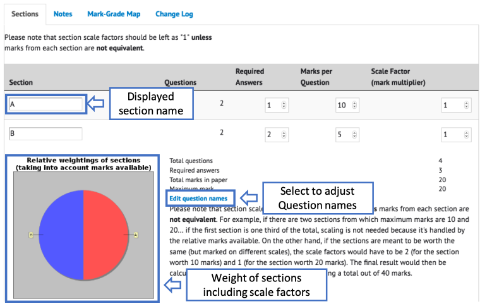
Figure 2: Exam Configuration page with labels indicating where to adjust section and question display names and highlighting the Relative Weightings chart.
Renaming sections and Questions
As the breakdown of the sections in the Exam tool may not match the breakdown of sections in the Exam paper, to make it clearer for markers (and for students if pairing the Exam tool with the Online Exam tool), the sections and questions can be renamed. Different sections can be renamed the same name.
To rename a section:
- On the Configuration page use the Use the field in the Section column to enter the new section name.
- Scroll down and select the Save Exam Paper Configuration button.
To rename questions:
- On the Exam Configuration page select the Edit question names link (see Figure 2).
- Using the fields next to the question numbers, enter the new display names.
- Select the Update Question button to save.
Notes columns
In addition to the standard numerical columns, it is possible to create Notes columns for entering text comments into the exam tool.
To create a new notes column:
- On the Exam Configuration page select the Notes tab (see Figure 3).
- Scroll down to the Create New Column section
- Enter the column name in the Create new note column field
- Select the Add Note Column button
To edit the display name of existing notes columns:
- On the Setup Exam page select the Notes tab (see Figure 3).
- Locate the note column you wish to edit
- Edit the display name in the field provided
- Select the Update Note Columns button to save
To delete an existing notes column:
- On the Setup Exam page select the Notes tab (see Figure 3).
- Locate the note column you wish to delete
- Select the note column using the checkbox to the right of the column name
- Select the Delete Selected Note Columns button to delete.

Figure 3: The Notes tab on the Setup Exam page allows creation and configuration of Note Columns
Mark-Grade Maps
Mark/Grade maps are used by MMS to turn marks into grades. MMS will calculate the percentage of marks the student has attained, and then locates this percentage position on the Mark-Grade map to determine the grade. If the student has achieved a percentage that is not explicitly defined on map, MMS will extrapolate based on the entered points and the interpolation between the points.
The default mark/grade map has two points: 0:0 and 100:20 with a linter interpolation between them therefore a student who got 0% will get a grade of 0, 50% will get a grade of 10 and 100% will get a grade of 20. However, often more complex mapping is required.
To create a new Mark/Grade model:
- On the Setup Exam page select the Mark-Grade Map tab.
- Enter the map point percentages into the Percentage(%) column (do not include the % sign)
- Enter the corresponding grades into the Grade column
- Select the interpolation from the drop down list under the map
- Select the Save Mark Map button to save the current map points.
- Scroll down to the Save this grade map as a model text box
- Enter a name for the model.
- Select the Save Model button.
- The new model will now appear in the ‘Replace Mark Map’ section on all exam tools in the school.
If all the points in the map are filled, clicking the Save Mark Map button will generate space for entering more points if required.
To replace the standard map with a saved map:
- Select the Replace Map button.
- On the Setup Exam page select the Mark-Grade Map tab.
- Scroll down to the Replace Mark Map section
- From the drop down list select the required map
Marking Guides
There are three main ways to enter marks into the Exam tool:
- Manual exam mark entry
- Bulk uploading exam grades via CSV
- Double marking
To manually enter marks into the exam tool:
- Access the Exam tool from the MMS Modules page or from the Academic activities workspace in MySaint.
- Scroll down the table until you locate the desired student
- Enter the marks into the text fields provided (see Figure 4)
- Scroll to the bottom of the table
- Select the Save Marks button to save.

Figure 4: An example of the Exam tool overview. Enter marks into the space provided and click the Save Marks button.
The View Options section can be used to filter the table to show only one group, a particular question, or a particular section. To alter the view, select the required options from the drop down lists and select the Change View button.
It is possible to bulk upload exam grades to the Exam marking tool via a CSV spreadsheet.
To prepare the spreadsheet:
- Label the columns of the spreadsheet so that the first column is labelled ‘Student ID’, and each successive column labeled ‘q 1’, ‘q 2’, ‘q 3’ . Where ‘q 1’ represents Question 1, ‘q 2’ representing Question 2 and so forth for each question.
- Populate the first column so that each row has the student ID listed. A list can be downloaded from the Exam marking tool.
- Enter the marks for each student into the appropriate columns.
- Save as a CSV file.
Upload the spreadsheet:
- Access the Exam tool from the MMS Modules page or from the Academic activities workspace in MySaint
- Scroll down under the mark table to the Upload CSV section.
- Select the Browse button and select the csv file for upload.
- Select the Upload Spreadsheet button.
- On the next page, you’ll see a table showing which marks MMS will upload:
- Blue cells = marks that will be uploaded
- Red cells = marks that can’t be uploaded
- Check the table to make sure everything looks correct.
- Select the Save Marks button to upload the marks, or leave the page if you don’t want to save them.
The exam tool can be configured to allow double marking – a process where two markers enter marks and the system will highlight any disagreement.
To configure the exam tool for double marking:
- Access the Exam tool from the MMS Modules page or from the Academic activities workspace in MySaint (see Exams – Creating and access the Exam tool).
- Select the Setup Exam option from the navigation panel on the left.
- From the Single/double marking is handled as drop down list, select Two sets of marks; must agree with each other
- Select the Save Exam Paper Configuration button to save
- Return to the exam tool overview by selecting the Exam Results option from the navigation panel on the left.
- New options will appear in the View Option section at the top of the page (see Figure 6)
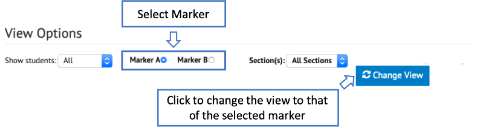
Figure 6: An example of the View Options section after Double marking is enabled. Use the toggles to switch views between markers.
To enter marks when using double marking:
- Open the Exam tool: You can access it from the MMS Modules page or via the Academic Activities workspace in MySaint.
- Choose your marker role: In double marking, there are two markers: Marker A and Marker B. At the top of the page, go to the View Options section and select whether you’re entering marks as Marker A or Marker B.
- Select the “Change View” button: This updates the page to show the correct marking view for the selected role.
- Enter marks: You can enter marks manually or import them using a CSV file.
- Save your marks: Select the Save Marks button to save your entries.
- Check for mismatches: If the marks entered by Marker A and Marker B for a question do not match, the cell will appear with a red background.
- View the other marker’s entries: Use the View Options section to switch between Marker A and Marker B views.
Once both markers enter the same mark, the red background disappears and the cell returns to the default grey.
Exam reports and Charts
In addition to the Exam overview which displays the current exam marks and grades, there is a Historical reports section which allows you to view exam marks as they looked in the past. These point-in-time reports are generated when marks are saved. To view the point-in-time reports:
The mark table will then change to display the data as it was at the point of time selected.
- Access the Exam tool from the MMS Modules page or from the Academic activities workspace in MySaint.
- Scroll down to the Historical reports section.
- Snapshots of data entry are listed by date. Select the report from the drop down list.
- Select the Show historic data button.
The Mark/Grade scatter plot shows how students’ exam marks correspond to their final grades. It also includes a line that visually represents the applied mark/grade map. An example is shown in Figure 7
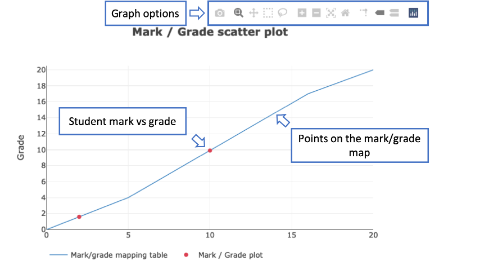
Figure 7: An exam Mark / Grade scatter plot. Student mark/grades are indicated with red points. Hover over the scatter plot to access the Graph options.
To view the Mark / Grade scatter plot:
- Access the Exam tool from the MMS Modules page or from the Academic activities workspace in MySaint.
- Select the Graph link from the navigation panel in the left.
- The Mark / Grade scatter plot appears at the top of the page.
Student marks/grades are represented with red dots, hover over or select the point to view the mark, grade and student name. To access graph options, such as downloading the graph as an image and to ‘zoom in’ on selected areas, hover over the graph to access the graph options. These will appear at the top of the graph – see Figure 7.
The Frequency of Exam Grades by Classification bar chart shows how students’ exam grades are distributed across classification bands. It provides a quick visual summary of overall performance. An example is shown in Figure 8.
To view the chart:
- Access the Exam tool from the MMS Modules page or the Academic Activities workspace in MySaint
- From the left-hand navigation panel, select Graph.
- The chart appears at the bottom of the page.
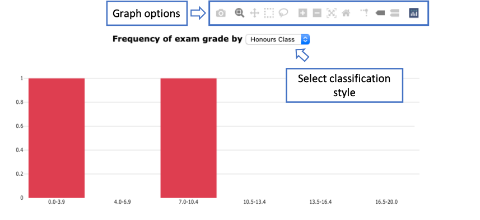
Figure 8: An example of the frequency of exam grades by classification bar chart. To change the classification style select a new style from the drop down list.
The student grades are grouped according to the selected classification style. You can change the style using the dropdown list above the chart. The available options are:
- Honours classification:
0.0–3.9, 4.0–6.9, 7.0–10.4, 10.5–13.4, 13.5–16.4, 16.5–20.0 - Masters classification:
0.0–6.9, 7.0–13.4, 13.5–16.4, 16.5–20.0 - Grade Points:
0.0–0.9, 1.0–1.9, 2.0–2.9, and so on.
To access additional graph options—such as downloading the image or zooming in—hover over the chart. Options will appear at the top of the graph (see Figure 8).